
Azure Data Factory is a cloud-based service, that allows you to retrieve data from many sources, transform them, and import them to the destination. The entire process can be created using a graphical interface in Azure Data Factory Studio.
Below, there are some steps, that should be taken to create a basic ETL process. Let’s assume, that the basic conditions for using the ADF service, such as having a Microsoft Azure subscription, creating Azure Data Factory and Linked Services, are already met.
1. Selection of a data source.
Azure Data Factory allows you to retrieve data from multiple sources. These include Azure platforms, relational and non-relational databases, services, and applications (over 90 connectors in total).
2. Creation of the pipeline.
This is an essential part of the ETL process. The pipeline is built based on activities, which can be compared to the tasks performed within the process. They are moved from the left side panel to the workspace using the „drag and drop” method. Newly added activities have an active status by default, but e.g. for testing purposes, we can deactivate them. In this way, a given task will be omitted in the process, without the need to remove it from the pipeline. An important aspect of creating a pipeline is conditioning the execution of individual activities. For example, if we have two consecutive tasks, we can define the relationship between them as follows:
- On Success – the next activity is performed when the previous one has been completed successfully (green arrow)
- On Fail – the next activity is performed when the previous one has failed (red arrow)
- On Completion – the next activity is performed, when the previous one has been completed – no matter with what result (blue arrow)
- On Skip – the next activity is performed when the previous one has not started (gray arrow)
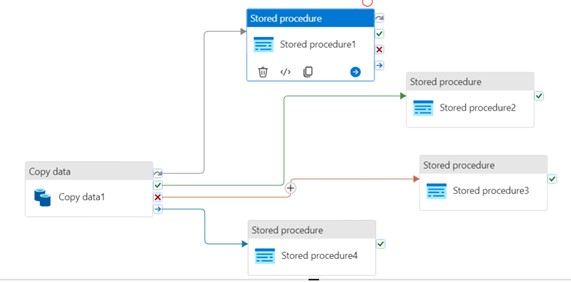
Thanks to the above functionality, we can flexibly configure alternative scenarios for the created pipeline, depending on the course of a specific process. This is also a convenient way to handle errors, otherwise, to provision several possible scenarios, we would have to use an activity „If Condition” – perhaps nested several times, which would make the code less readable and harder to debug and maintain.
After you have finished working on the pipeline, it is worth using the „Validate” option, to check, if the pipeline has been configured correctly. The validation result will be visible on the right side of the screen, in case of any faults/errors, they will be listed along with their source.
The final step is to save your work using the „Publish All” button.
3. Launching the pipeline.
There are several options for starting the pipeline, which differ in technical details. They can be generalized by distinguishing two groups of events, where the pipeline can be started:
- manually: by selecting the „Debug” or „Add Trigger – Trigger Now” option – this way the process is started when the button is clicked
- automatically: by selecting the „Add Trigger – New/Edit” option, where, depending on the type of trigger, a process launch schedule is set (date, time, and frequency) or the process launch depends on the occurrence of a specific event.
4. Progress tracking.
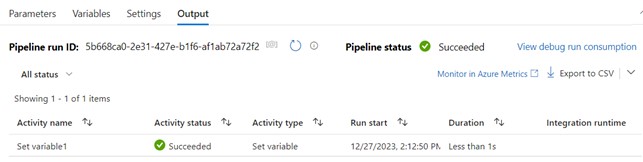
After starting the process, we can check its progress in the panel at the bottom of the page.
We will see a separate record for each activity, we have defined. Tasks completed successfully will be marked with a standard green icon, while tasks completed with an error will be marked with a red one. The record will also include the execution time of the action, which is worth paying attention to, in the context of process optimization.
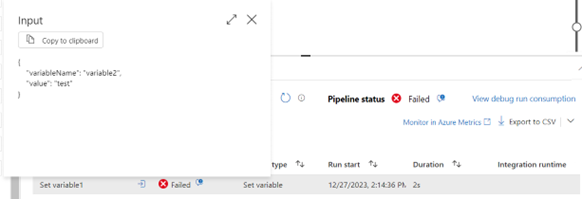
5. Error debugging (optional).
If, as a result of running the pipeline, some tasks end with an error, we can check their details by clicking on the given task. An example of a simple error would be assigning a text value to a numeric variable as part of a „Set Variable” task. Information about the activity will be displayed in JSON format, where the key is generated by ADF and the value represents values provided by the user.
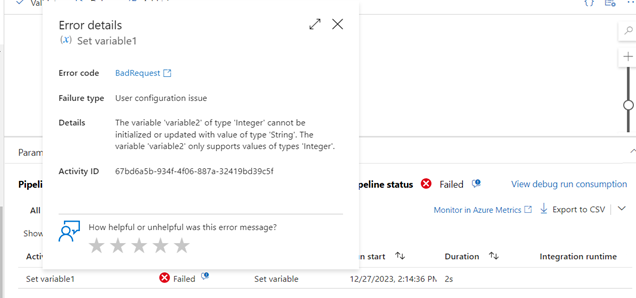
In the status details, we can see the error description as plain text, so we can correct the pipeline.
To sum up, ADF has a wide range of sources and data transformation capabilities to create comprehensive ETL solutions. Above is a short guide on how to navigate the ADF and what is worth paying attention to, when building the pipeline. For SSMS or SSIS users, working with ADF should be easier, because some activities refer to SQL structures, e.g. „Filter”, and „If Condition”. Knowing the logic of these constructs will make it easier to use a different ADF syntax.
Do you need to set up your ETL process? We’re happy to help!